One-click presets: a prompt library for architects, planners and developers
The new Presets tab — ready-made styles that generate a visual in one click, custom presets with reference images, and the multi-model engine behind them.
The full creator in Planlift is powerful, and that's exactly the point when you need fine control over viewpoint, materials, context and detail. But a lot of the time, you don't want to work through a menu of options. You want the same style you used last time, applied to a new drawing, in under a minute. That's what the new Presets tab is for.
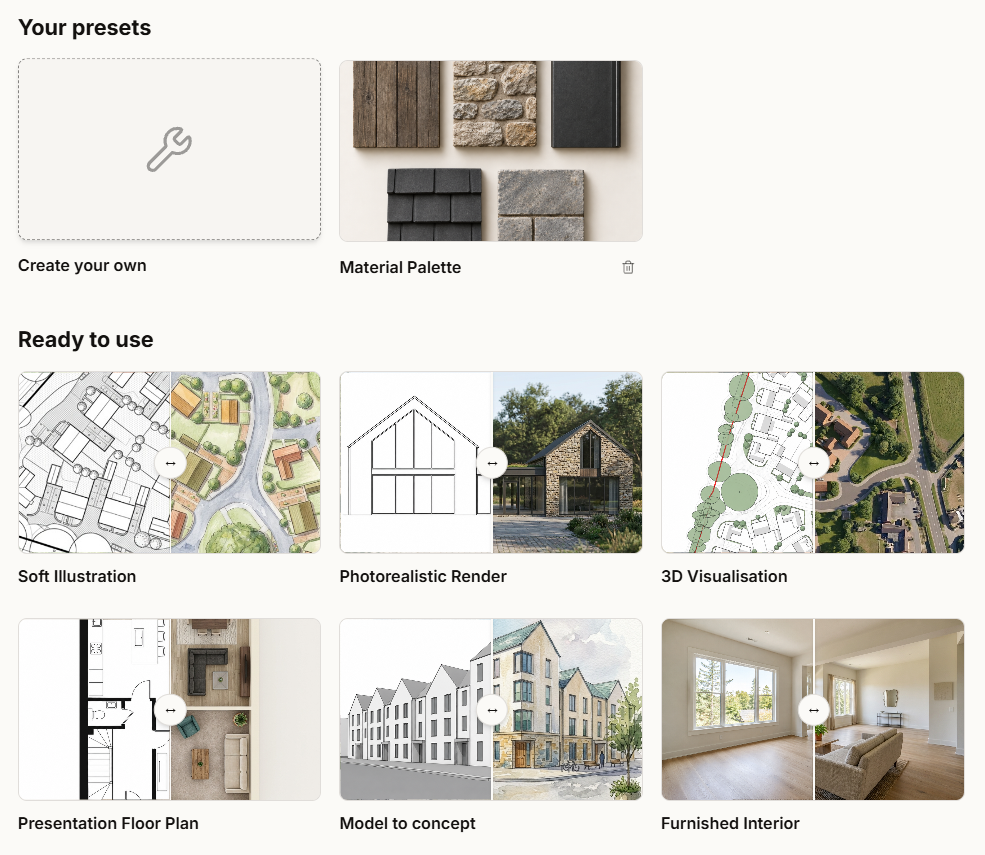
Think of it as a prompt library. Each preset has the wording built in, the kind of careful, structured prompt that produces a consistent result, so all you do is upload your drawing or photo and hit generate. No picking options, no writing prompts, no trial and error.
Ready-to-use templates
The built-in presets cover the styles we see people reach for most often. A few examples:
Soft Illustration turns a line drawing or plan into a gentle, coloured illustrative visual, the kind of thing that reads well in a community-facing document. Photorealistic Render takes the same drawing and produces a full CGI with realistic materials, lighting and shadows. Presentation Floor Plan colours up a technical floor plan with material tones, furniture and soft shadows, viewed straight down. Landscape This Space adds realistic planting, paving and street furniture to a scheme without touching the buildings. Photo to Linework does the reverse, turning a photo into a clean black and white architectural line drawing.
There are also presets for the jobs that come up less often but are fiddly to set up from scratch. Upscale Image sharpens a low-resolution or blurry visual. Develop my sketch takes a rough hand drawing and turns it into a clear architectural concept. Explore an extension adds a sympathetic extension to an existing building, keeping the original and the camera angle unchanged.
Each one is a single upload and a single click. One credit, one image, same as the creator.
Create your own
The built-in presets are a starting point. The real power move is building your own.
Type a prompt, pick an output style, and optionally attach a reference image. The reference image is the part that matters. Say you've got a material palette you like: a specific brick, a render finish, a roofing tone. Save it as a reference on a custom preset, and every time you run an elevation through that preset, Planlift sends both your new upload and the reference. The layout, composition and content come from what you uploaded; the style, materials and character follow the reference.
That's how you build a consistent set of visuals across a scheme. The same palette running through every elevation, every block, every view, without re-describing it each time. Your custom presets sit alongside the built-in ones on the Presets tab, ready to use again.
What's happening under the surface
Two things are worth knowing about, because they're quietly doing a lot of work.
First, Planlift is now multi-model. Rather than being tied to one image-generation technology, we select the best one for each job. Some presets run through the GPT image model; others through the default model. The choice is made per preset, based on what each task actually needs. Upscaling calls for one kind of model, a soft illustration for another. You don't see any of this; you just get the better result.
Second, for the more complex presets, the system doesn't go straight to the image. Front + Side Elevation to Visual is the clearest example. You upload four labelled elevations, and before anything is rendered, the model reads the sheet: which elevation is labelled front (not guessed from the compass or the entrance, but read from the label), which side physically adjoins it, what the roof geometry and materials are. It locks the viewing corner from that analysis, and only then does it render. The result is a three-quarter view that actually matches your elevations, with the right facade dominant, the right side visible, and openings and proportions where they should be, rather than a rough approximation.
Where this is heading
The goal is straightforward: for Planlift to become the one-stop shop for visualising a scheme, whatever stage you're at and whatever style you need. The full creator handles the detailed work. Presets handle the repeatable work. Custom presets handle your specific look. Together they cover the range from a rough sketch through to a marketing-ready CGI, without leaving the tool.
As always, a word on what these are and aren't. Presets produce indicative visuals for concept and communication: fast, useful, and honest about their limits. They're not technical or submission-ready drawings, and the design judgement stays with you.
New accounts get 5 free credits, which is enough to try a couple of presets against a real drawing and see where they land. Sign up and have a look at the Presets tab. The built-in ones are ready to go, and the create-your-own option is there when you want something more specific.
Made with Planlift. AI-generated indicative visuals for concept and communication purposes only.